Typescript + Express Template (just add npm)
TLDR; Just clone my Github repo and run npm install (or
yarn install) inside the folder and you’ve got everything you
need to create a TypeScript backend project! Complete with ESLint rules to
keep your code clean: https://github.com/bandrewfisher/ts-express-template
A few months ago, I began experimenting with TypeScript. The only reason I did so was because I was enrolled in a software engineering class at my university, and the final course project consisted of creating a Twitter clone. For the backend, we could either write it in Java or Javascript, and being the JS nerd I am, it was an easy choice. However, if we chose the Javascript route, the requirement was it needed to be in TypeScript. I decided to use Express for my backend framework. I’m glad I took this opportunity to start learning TypeScript, because long story short I ended up falling in love with it.
However, getting everything working wasn’t exactly a walk in the park. In this post, I’m going to help you get up and running with TS + Express with very little friction. You’ll be ready to create a TS backend project in no time!
Create the project
Let’s call our project “ts-express”. Create a new folder and
cd
into it.
$ mkdir ts-express
$ cd ts-express
Now initialize the project with:
$ npm init
You will then see a series of questions about your new project - you can just hit enter on all of them. You can always change things later if you need to.
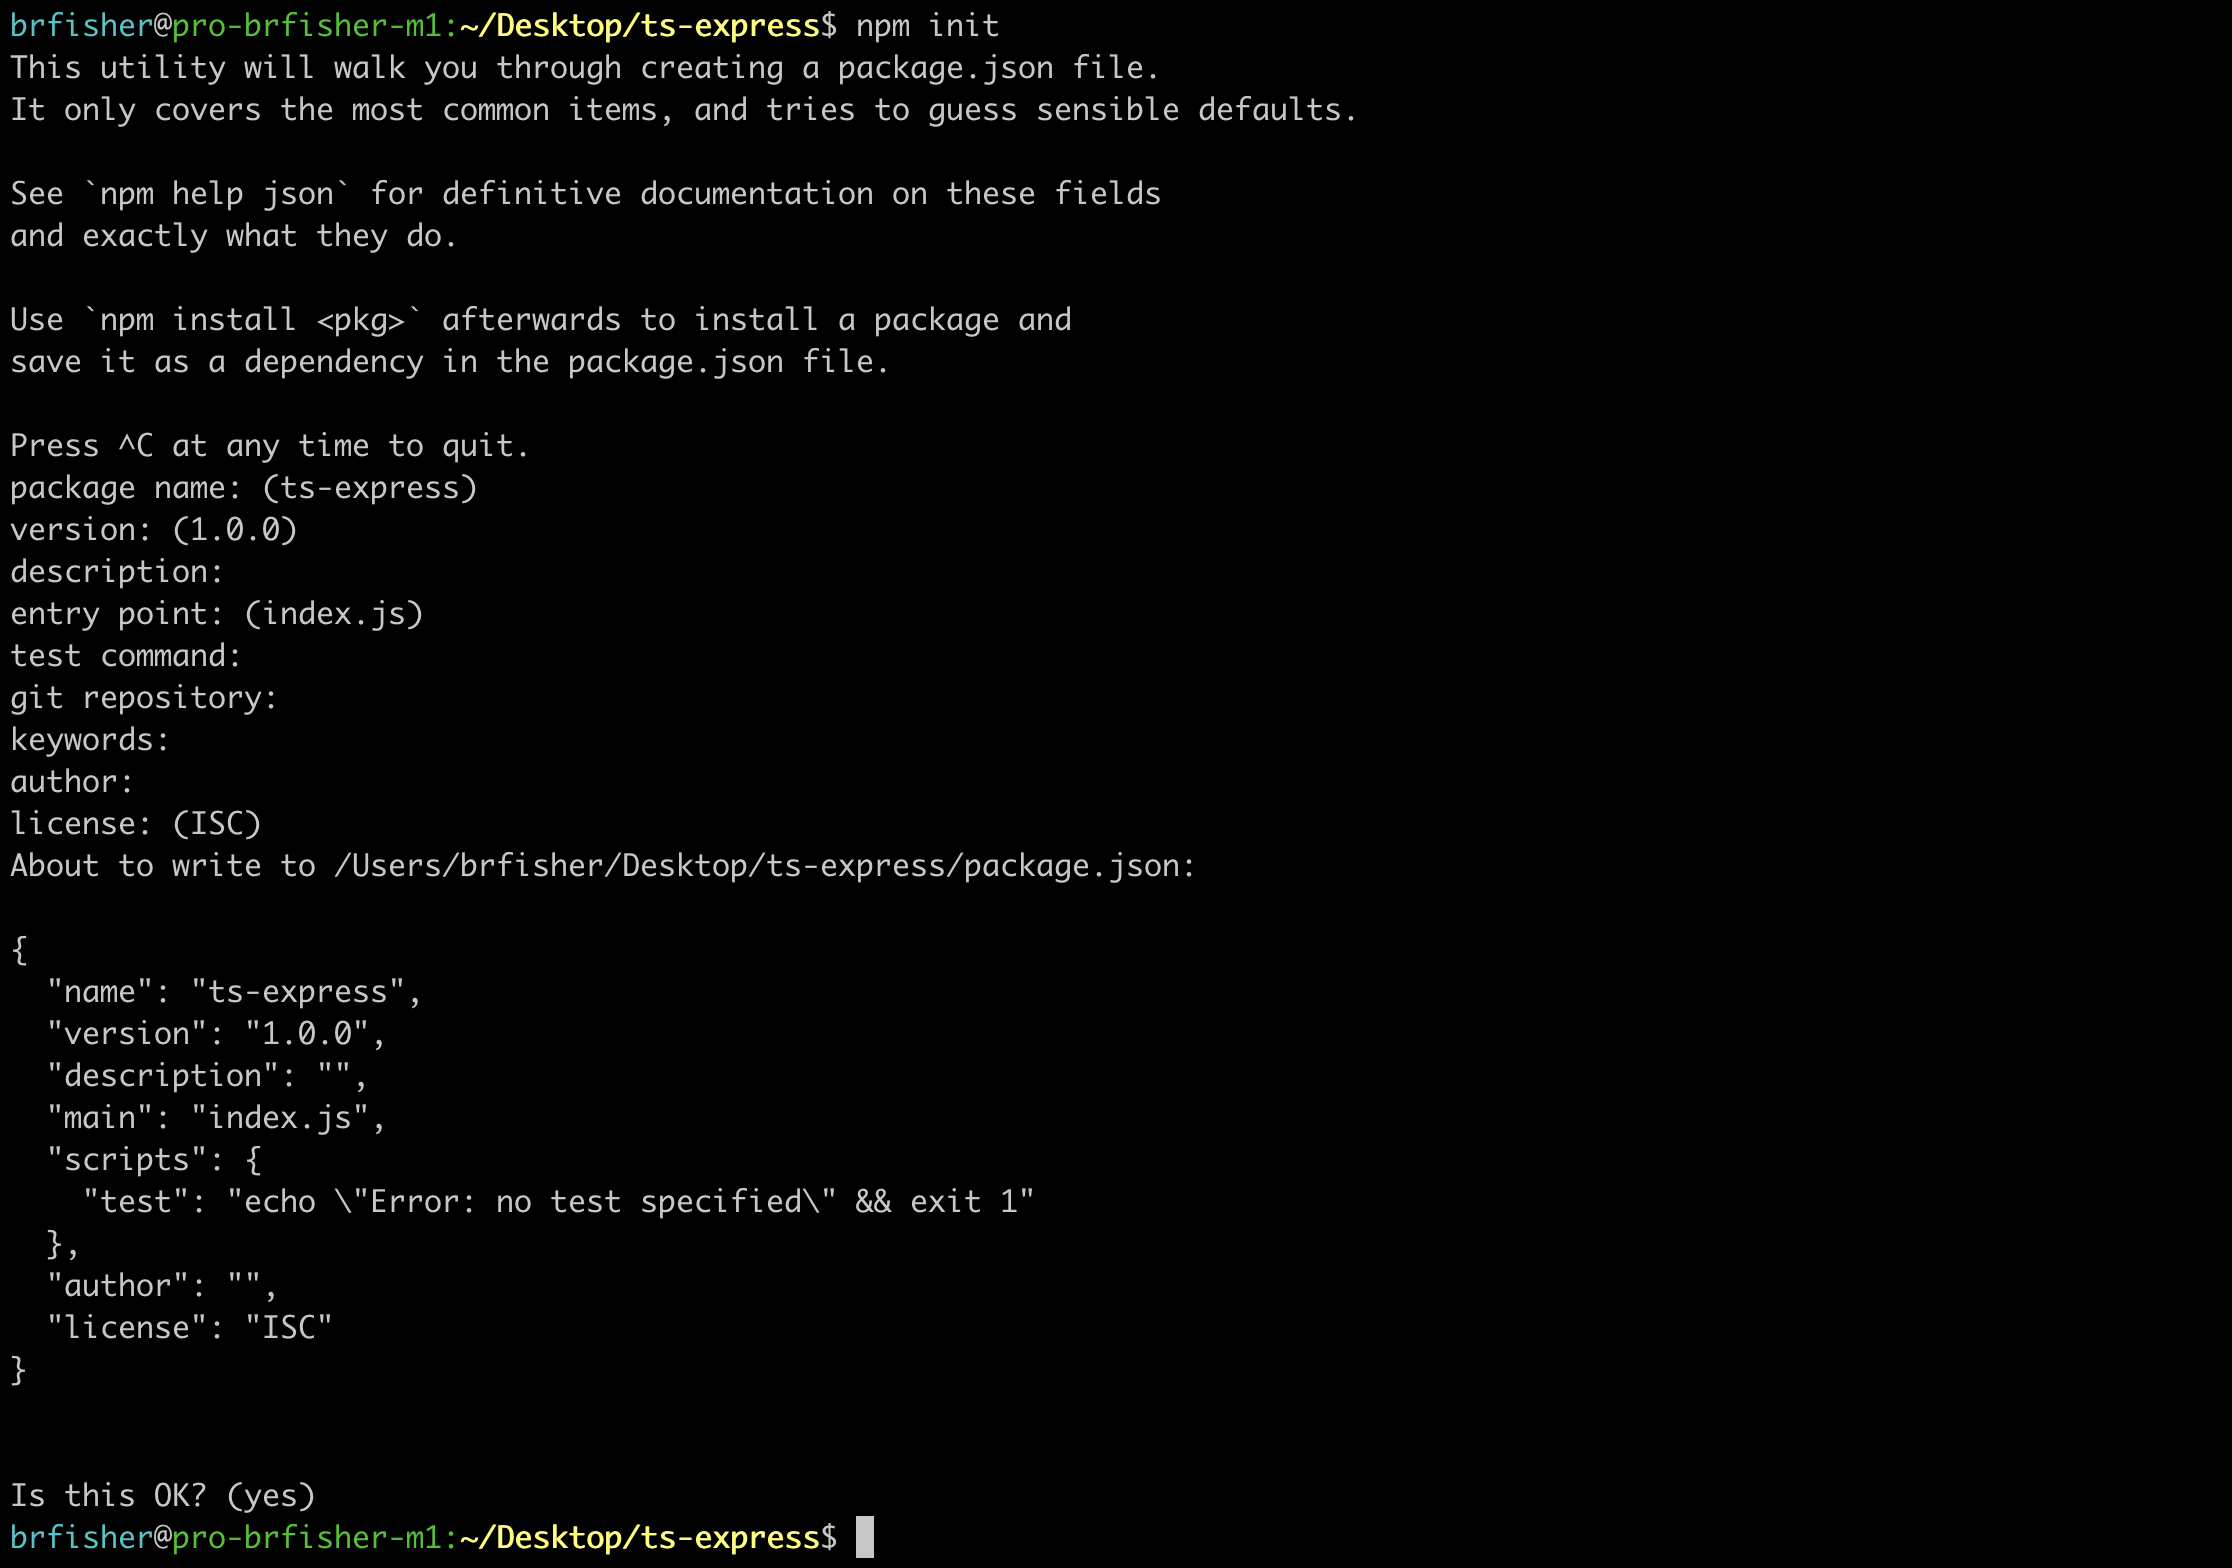
Go ahead and open the folder in VSCode - you’ll see a single package.json file that the npm CLI created. We’re going to beef it up a little bit later, but for now let’s install the dependencies our TS + Express project is going to need.
Setting up TypeScript
First of all, we’ll need to download typescript. We’ll save
it as a dev dependency since we’ll only need it while we’re developing so
it can transform our .ts files into normal .js files. Let’s run the
following:
$ npm i --save-dev typescript
Next we’ll want to create a tsconfig.json
file. This just tells TypeScript that the directory is the root of a
TypeScript project and will lay out options for compiling our files.
You can actually use the tsc CLI to create this file for you!
Just run:
$ npx tsc --init
You’ll see a new tsconfig.json file in your project. Open it
up and you’re going to see a ton of commented out options. I would at
least read through the comments so you’re aware of the options out there.
When you’re ready, replace the contents of your tsconfig.json
with the following:
{
  "compilerOptions": {
    "target": "es5",
    "module": "commonjs",
    "lib": ["DOM", "ES2016"],
    "allowJs": true,
    "checkJs": true,
    "sourceMap": true,
    "outDir": "./build",
    "removeComments": true,
    "strict": true,
    "noImplicitAny": true,
    "strictNullChecks": true,
    "strictFunctionTypes": true,
    "esModuleInterop": true,
    "forceConsistentCasingInFileNames": true
  },
  "include": ["src/*"],
  "exclude": ["node_modules"]
}
The comments in the autogenerated tsconfig.json
file give pretty good explanations of what most of these options do. I’ll
go ahead and explain a few of them in case you’re curious (feel free to
skip to the next section if you’d rather keep building the project).
The “lib” option tells the TS compiler to include specific library files
in the compiled result. The “DOM” option gives us access to DOM specific
methods such as console.log, which is going to be great for
debugging. I added “ES2016” so that we will be able to use cool new ES2016
featuers like arrow functions and the spread operator.
I set “sourceMap” to true to tell the compiler to generate .map files for
each .js file it creates. Source map files are going to make debugging way
easier - they essentially map the built JS files back to our unbuilt TS
files. That means you’ll be able to set breakpoints in your TS files and
be able to step through your code as if node
were executing the TS code when in actuality it’s really running the built
JS files.
“outDir” is the directory where our built JS files will appear. When we
build our code, the files will be placed in a build
directory.
At the bottom of the file, I added an “include” option, which is exactly
what you might think it is. I passed in an array with the value “src/*”,
which is going to tell the TS compiler to only build the files inside of
the src directory. I also added an “exclude” option and
passed in “node_modules”. In case we have any subpackages inside of our
src folder, we wouldn’t want the compiler to try and build
them. Technically, the compiler ignores node_modules
by default, but there’s no harm in having it there.
The other options are pretty self-explanatory from the comments in the original file (except for “esModuleInterop” - I don’t know what it does, but it was one of the defaults so I kept it just to be safe :P). If you want to know more about how you can configure your TS projects, I would recommend taking a look at the official docs: https://www.typescriptlang.org/docs/handbook/tsconfig-json.html
Building our TS files
With TypeScript set up, let’s go ahead and test it out. We’ll create a
src
folder and then an index.ts file inside.
$ mkdir src
$ touch src/index.ts
Let’s edit that index.ts file. Add the following to it:
const message: string = "Hello Typescript world!";
console.log(message);
Next we’ll add a build script to our
package.json
that will - you guessed it - build our code.
{
  ...
  "scripts": {
    "build": "tsc"
  },
  ...
}
Let’s try it out.
$ npm run build
You’ll notice a new build folder was created that contains an
index.js file and an index.js.map file. We specified that our built files
should be put in the build folder and that source map files
should be created in our tsconfig.json.
Let’s run our program:
$ node build/index.js
You should see “Hello TypeScript world!” logged to the console! If you’re worried about having to build the project every time you want to test a change, don’t worry. We’ll configure things later so that we don’t have to do that, but first let’s get Express set up.
Setting up Express
Now that we’ve got TypeScript working, let’s add express to
our project.
$ npm i --save express @types/express
Let’s edit our src/index.ts
file to spin up a simple Express server. Replace your index.ts code with
the following:
import express from "express";

const app = express();
app.get("/", (_req, res) => {
  res.send("Hello world!");
});

const PORT = process.env.PORT || 5000;
app.listen(PORT, () => {
  console.log(`Listening on port ${PORT}`);
});
Go ahead and run the following to start your server:
$ npm run build
$ node build/index.js
Navigate to localhost:5000 in your browser, and you should
see “Hello TypeScript world!” displayed!
Now, it’s going to get really annoying if every time we make a change to
our server code, we have to rerun our build script and restart everything.
Thankfully, there’s a package called ts-node-dev
that will solve that problem for us. It will let us start our server once,
and then whenever we make a change it will refresh it for us. It’s kind of
like nodemon but for TypeScript. Let’s install it:
$ npm i --save-dev ts-node-dev
Let’s make a start script in our package.json that uses this
to our advantage:
{
  ...
  "scripts": {
    ...
    "start": "ts-node-dev --respawn --transpileOnly src/index.ts",
    ...
  }
  ...
}
Now run npm run start. Try making a change to your index.ts
file and saving it. The server will automatically restart! That’s going to
speed up our development a ton.
Adding ESLint
Right now, we’ve got just about everything we need to start developing an Express app in TypeScript. However, it would be nice to enforce coding styles. If multiple developers start working on the project, then we’re going to need to automate the process of checking the code to make sure the style is consistent. Do we want single quotes or double quotes around strings? Should we allow console.log? Should there be an error if someone declares a variable but never uses it? Manually checking all these little details is going to get tedious and is going to distract from actually writing the business logic of our code. Luckily, ESLint solves this.
ESLint is a package that will analyze our code and tell us about errors
and warnings, all according to the configuration file we set up. If you’re
using VSCode, I would highly recommend downloading the
ESLint extension. Once it’s installed, we’ll need to download the ESLint npm package and
set it up. Let’s download eslint
and initialize our project like so:
$ npm i --save-dev eslint
$ npx eslint --init
You’ll be asked a series of questions about how you want to set up your linting. There are sets of predefined rules out there, and I opted to use Airbnb’s ESLint config. Here are all of my responses to the questions:
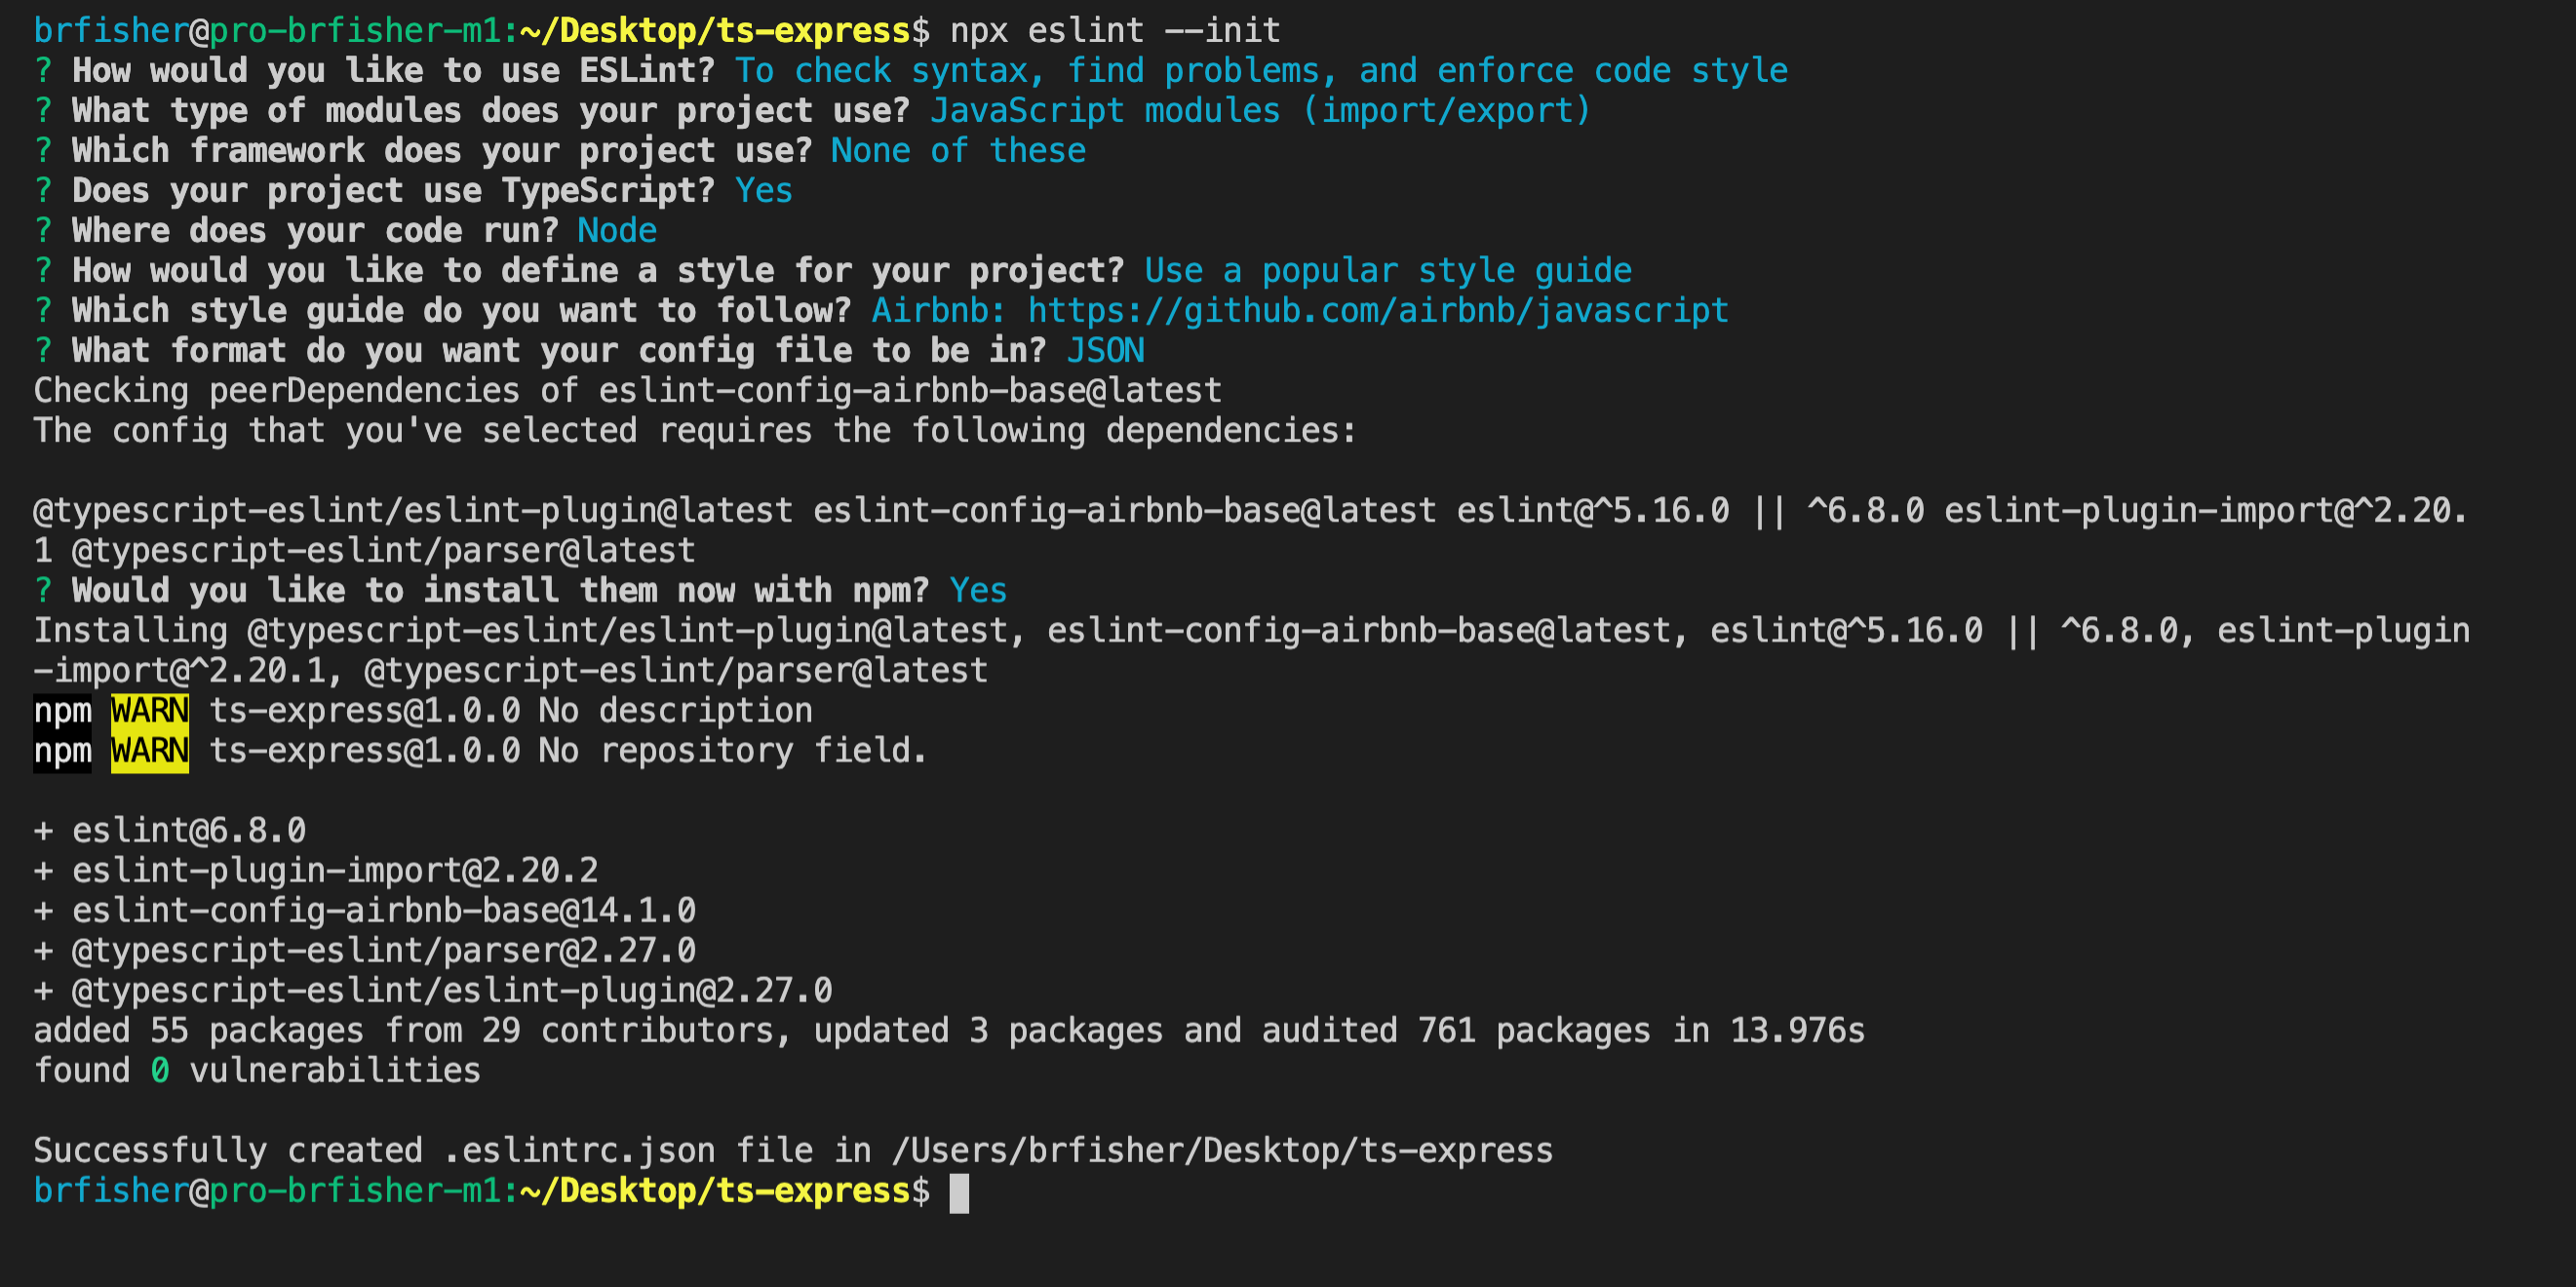
Notice that an .eslint.json file has been created in your
project directory. Look at your index.ts
file in VSCode and try putting “express” on the first line in double
quotes instead of single. If you downloaded the ESLint extension, you’ll
noticed it’s underlined in red.
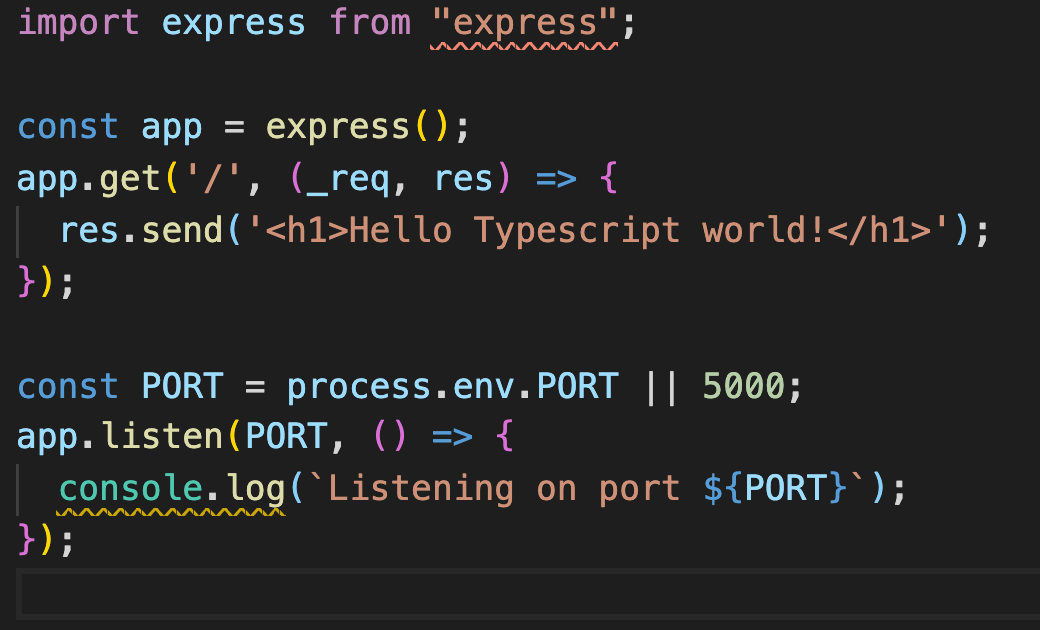
Change it back to single quotes to make the error go away. Now, we could fix all errors that ESLint tells us about manually, but we can actually have VSCode format our files using ESLint’s rules whenever we save. To do this, you’ll first need to enable ESLint as a formatter. Go to VSCode’s Settings (Code > Preferences > Settings in the menu bar) and then search “eslint format enable”. Make sure the first option that shows up (“Enable ESLint as a formatter”) is checked.
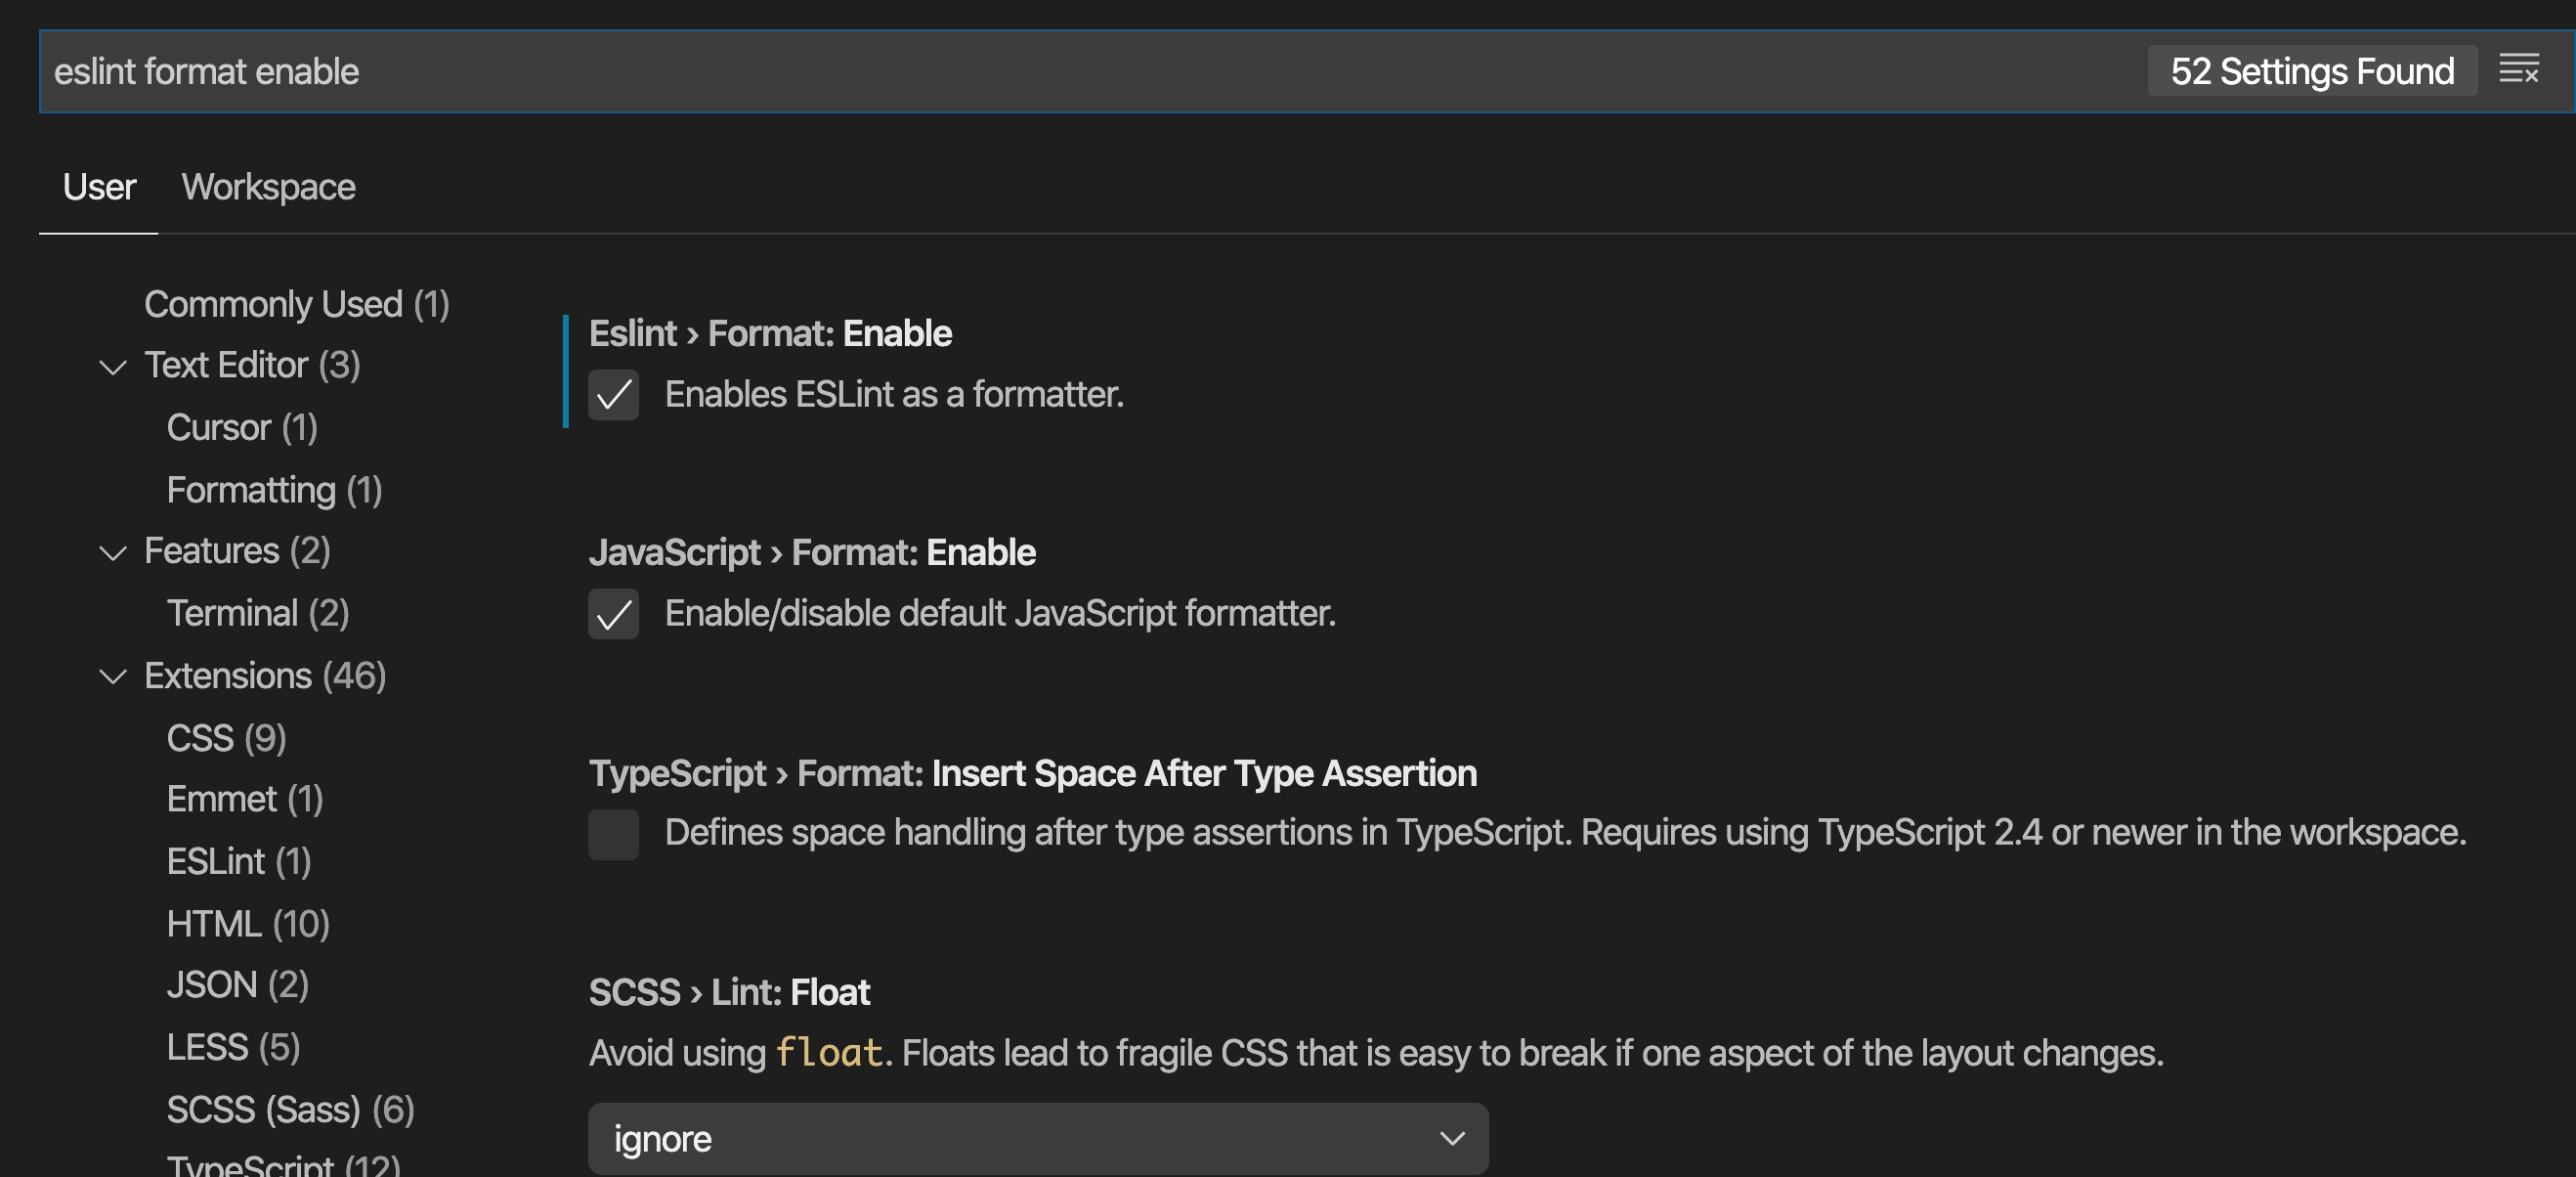
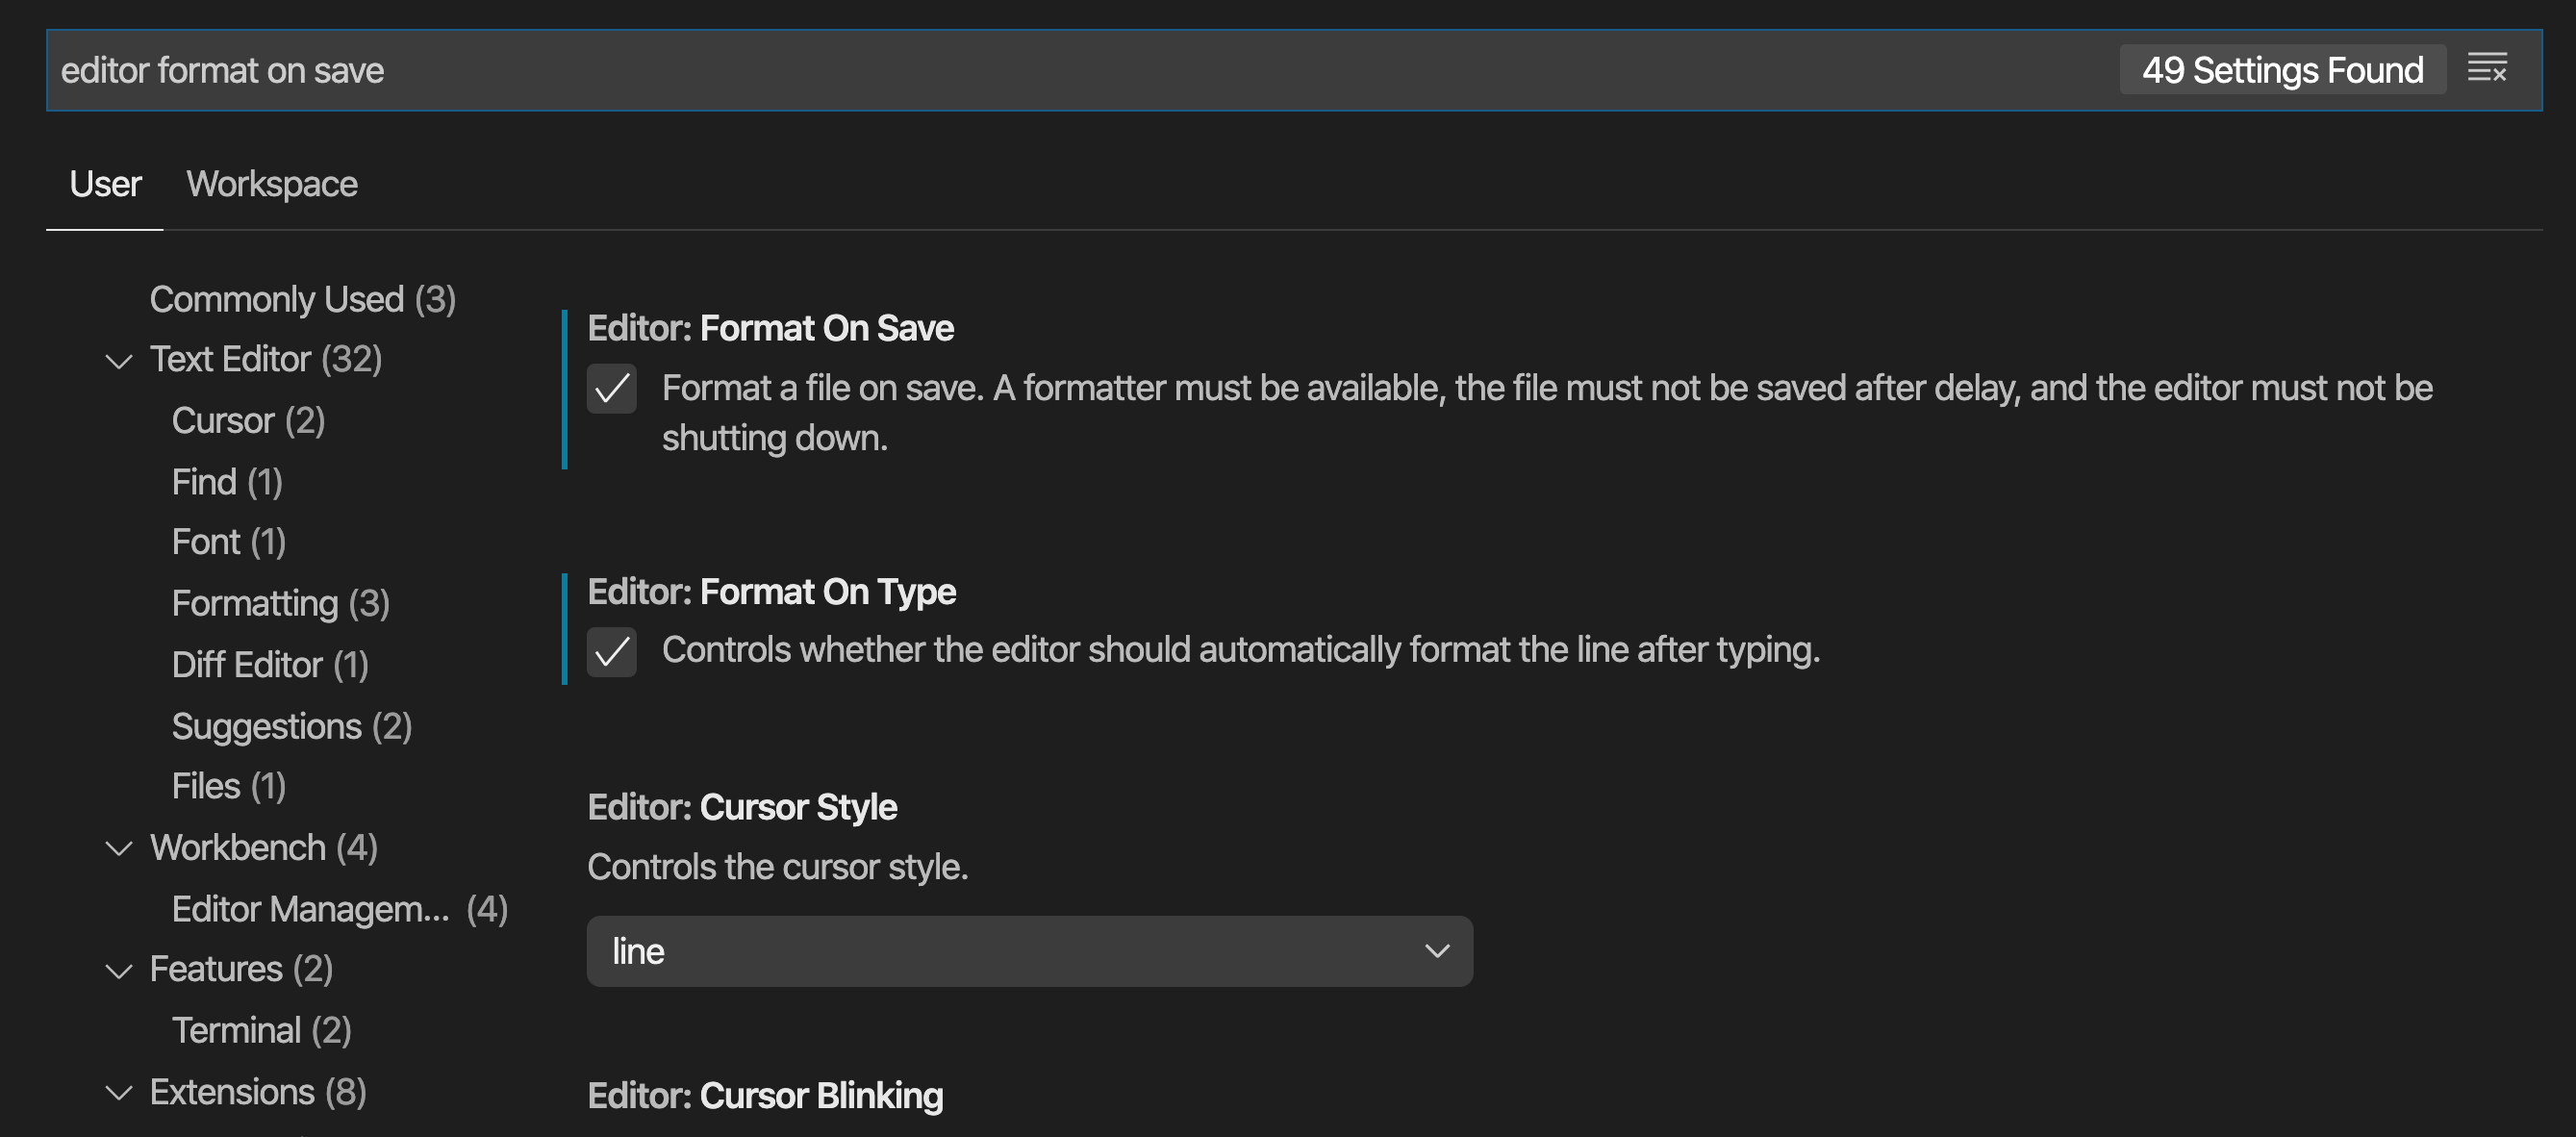
Next search for “editor format on save” and check the box that says “Editor: Format On Save”.
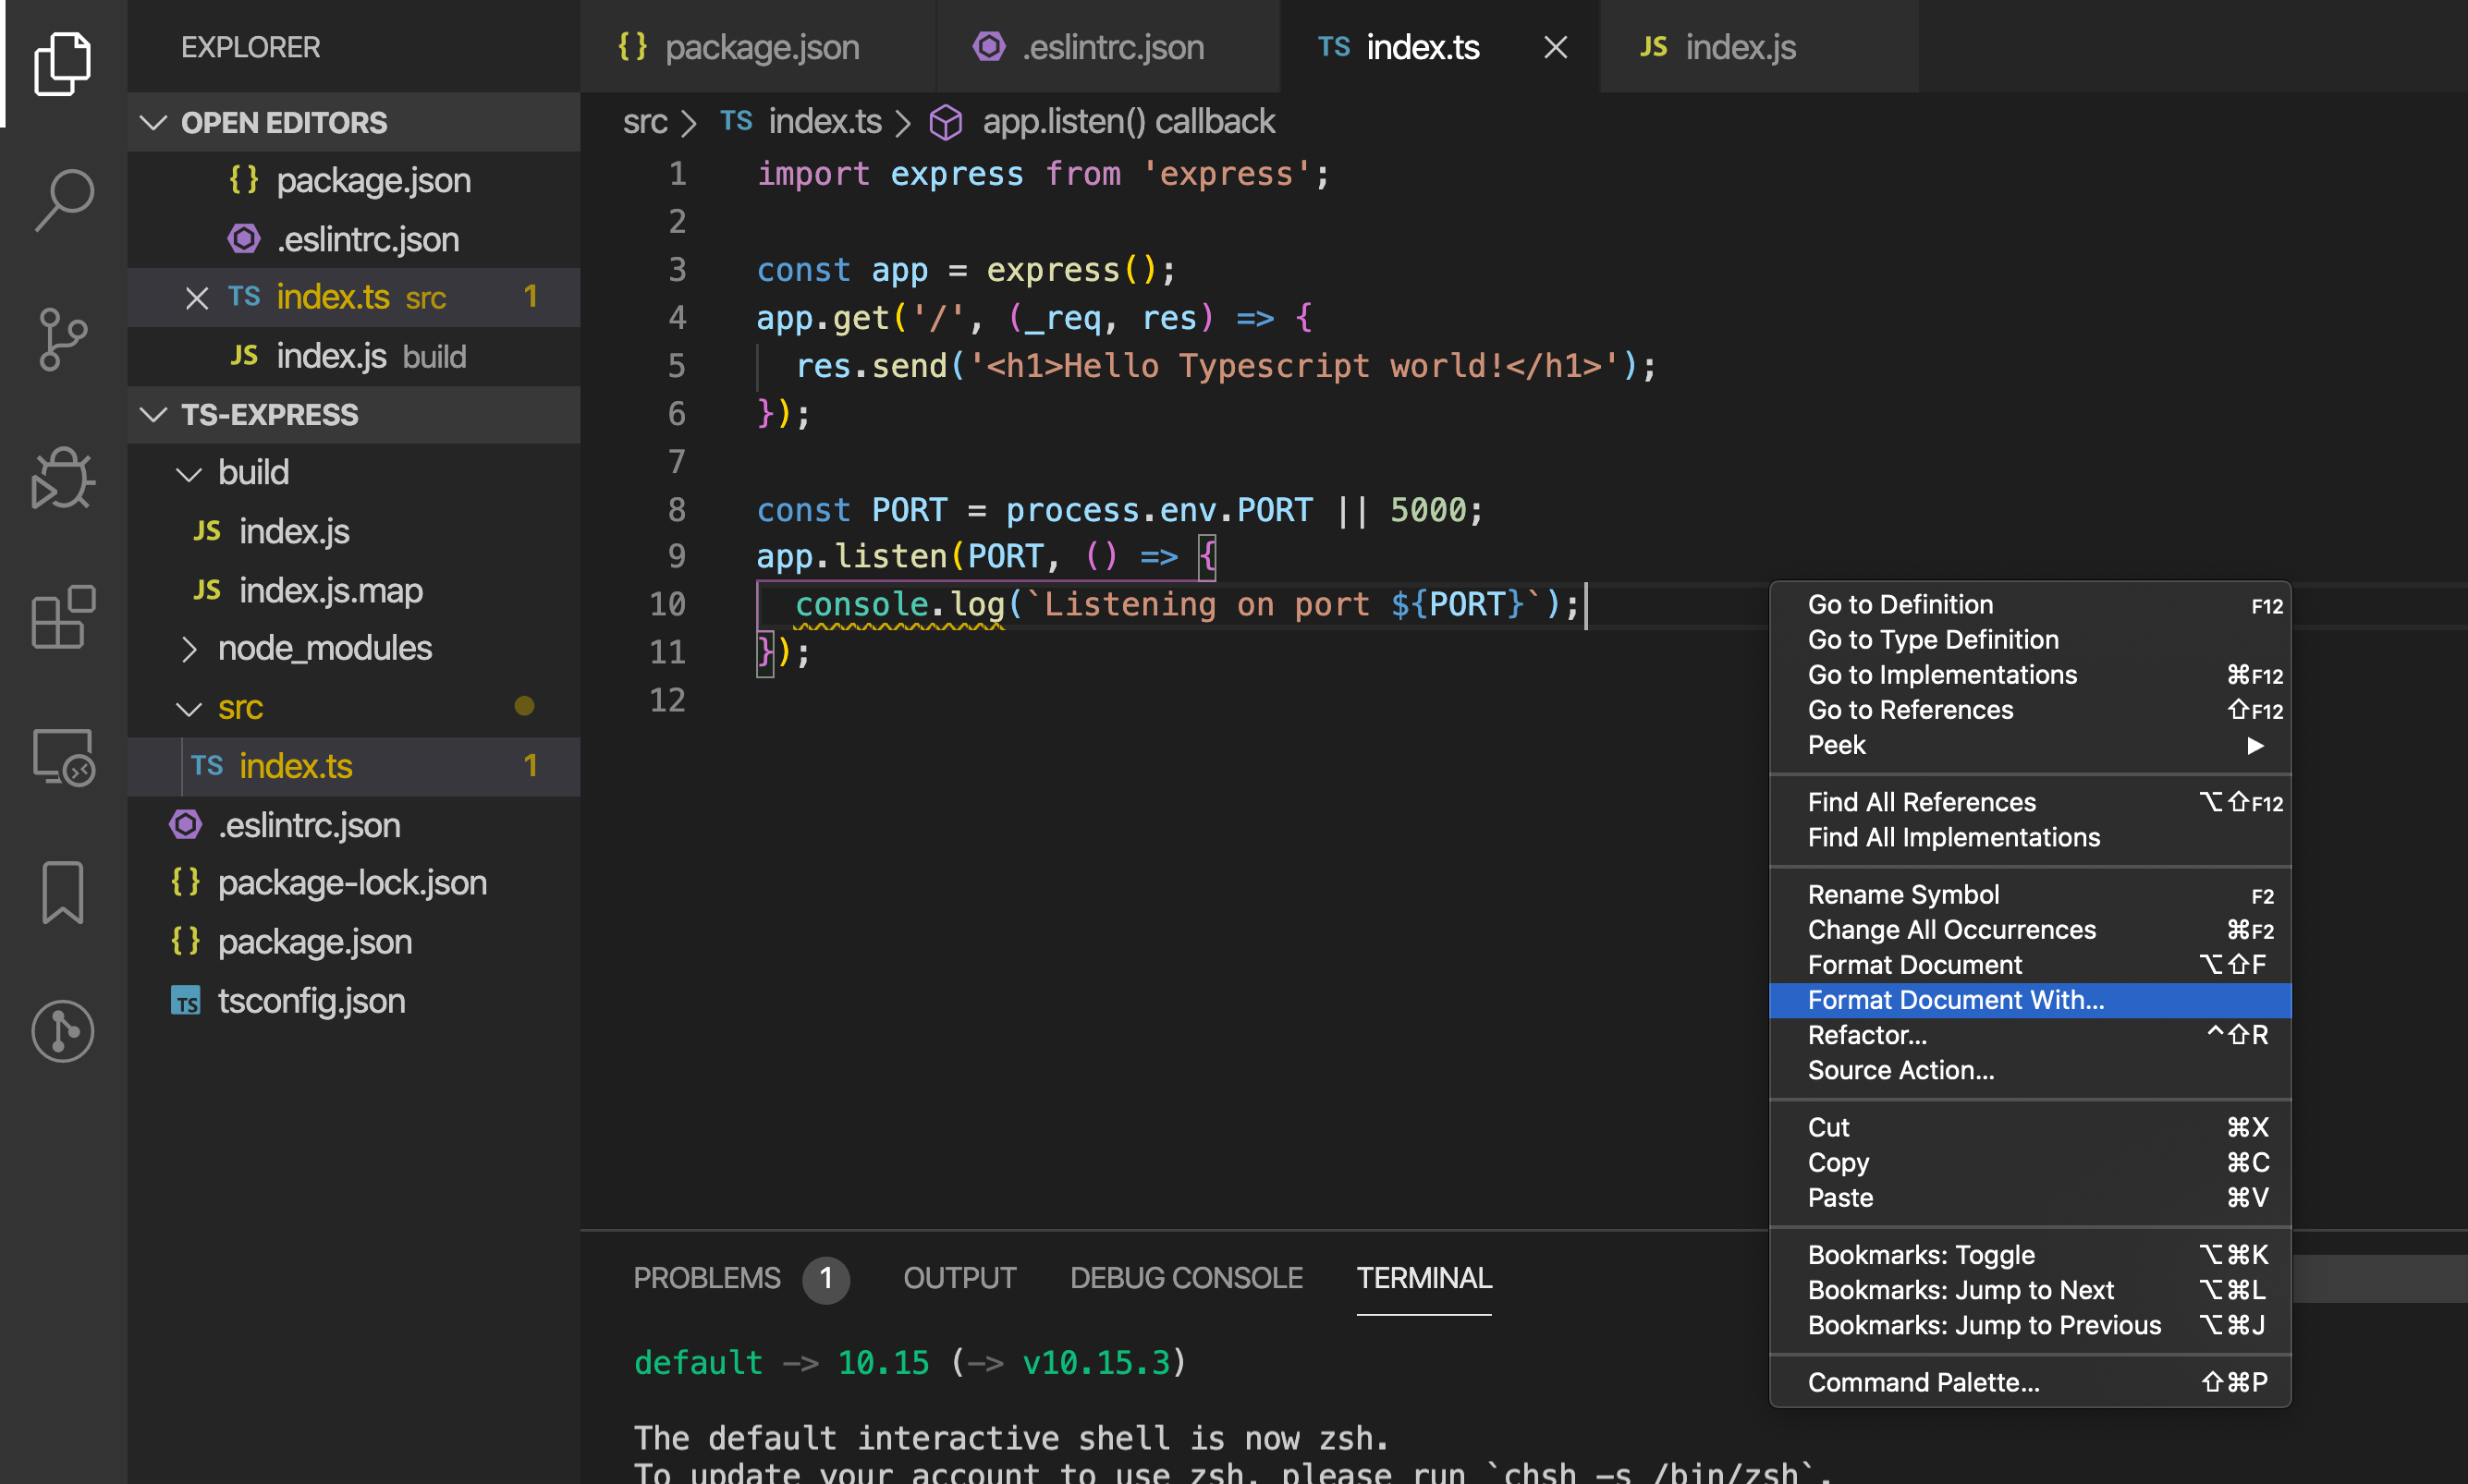
Go back to your index.ts
file and right click. Select “Format Document With…” and then at the top
select “ESLint” (if you already have other formatting extensions
installed, you may have to disable them in your workspace to see this
option. I had the Prettier extension installed and needed to disable it
for my workspace and then reload VSCode first.)
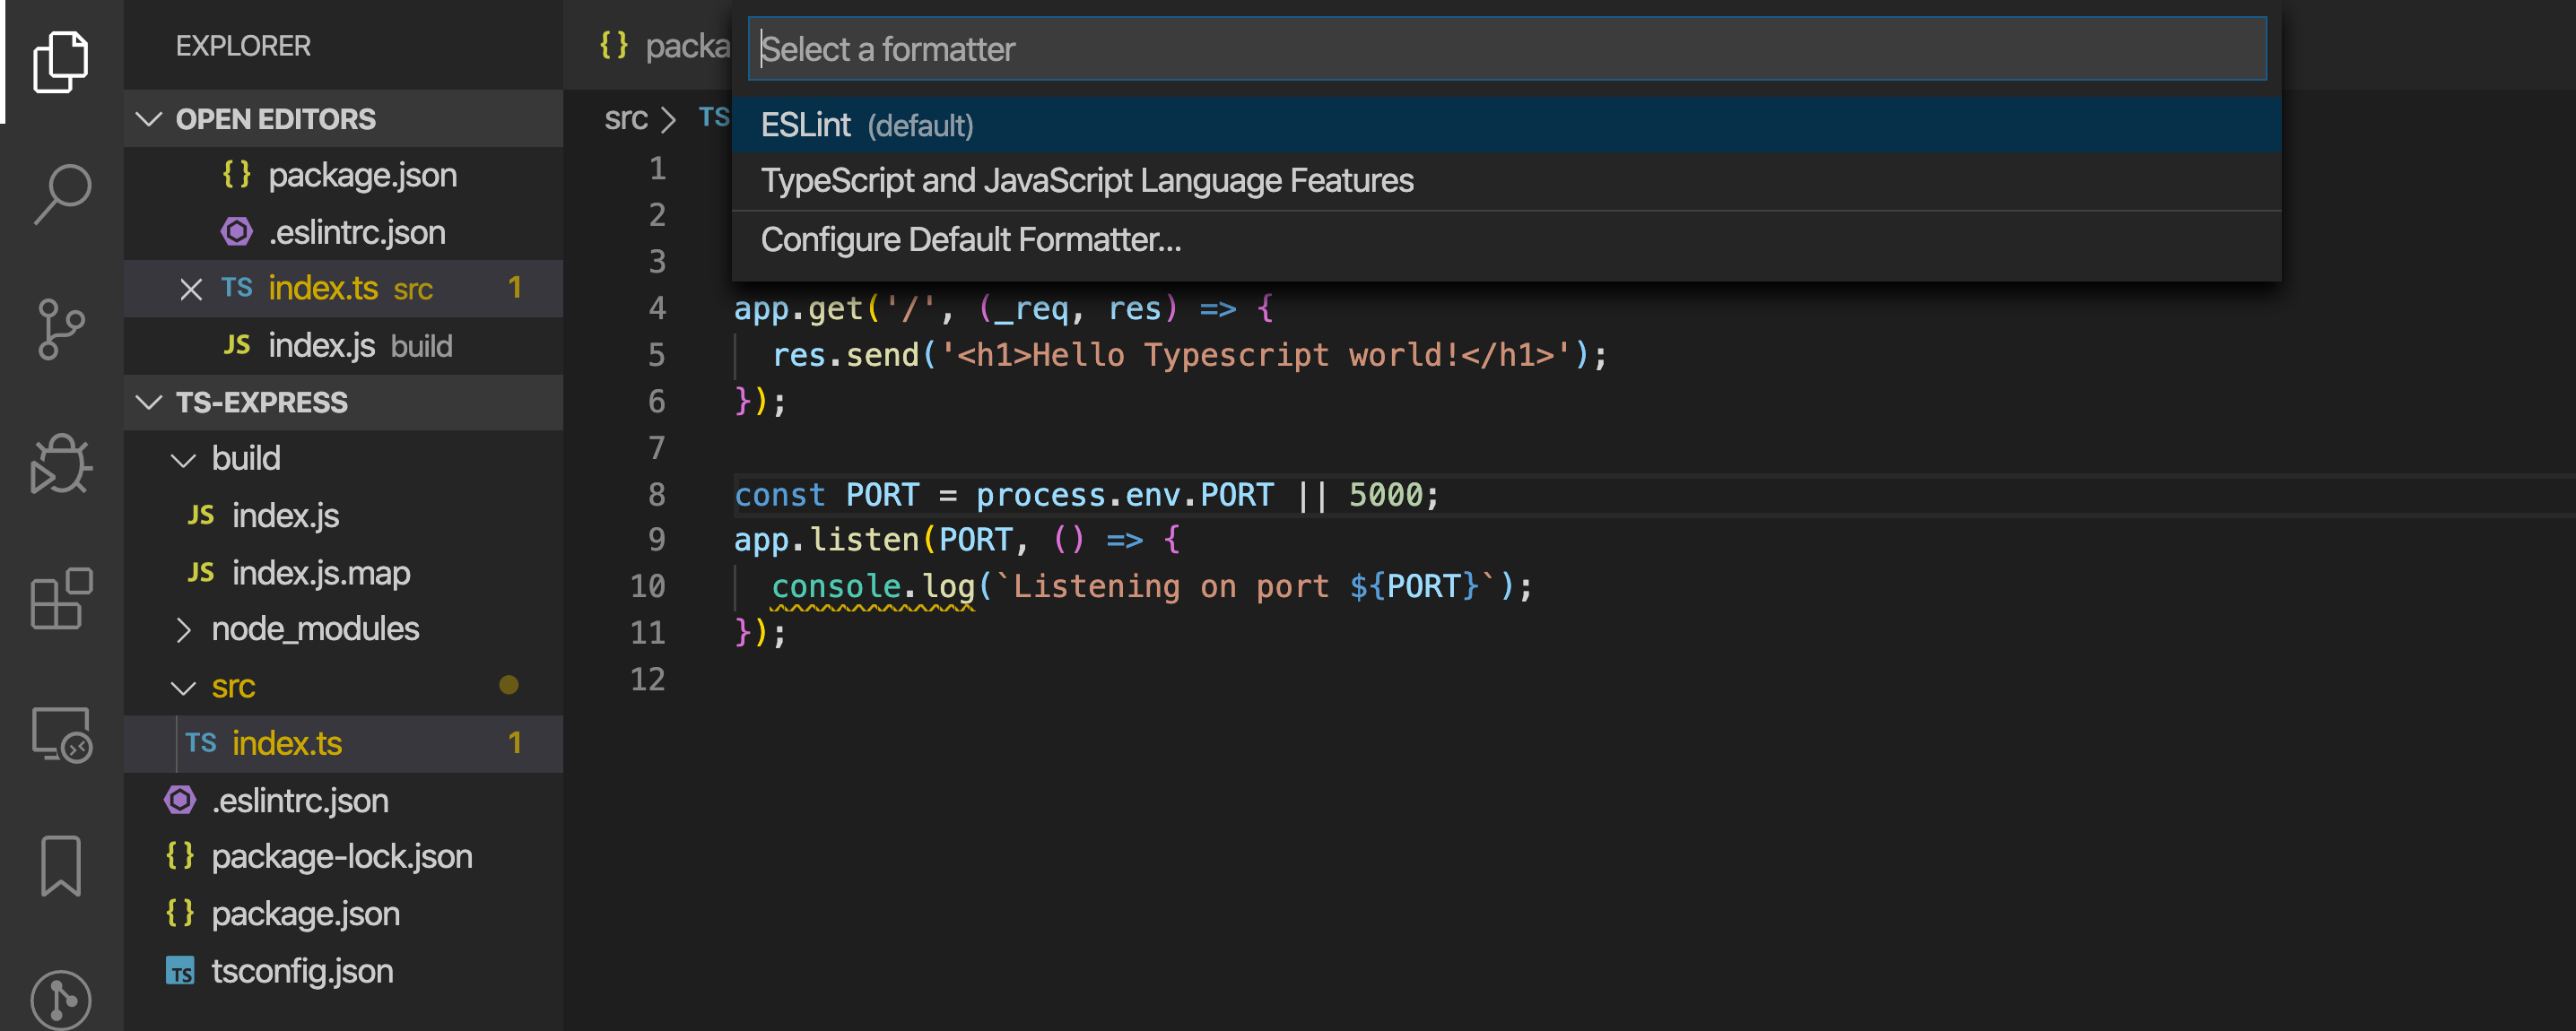
Once again, change the quotes in index.ts
to double quotes and then save. It should automatically be changed to
single quotes! The Airbnb config we chose has a lot of rules like that,
and formatting on save is going to save us a tremendous amount of time and
let us focus on writing code instead of how we format it.
We’re almost done setting up ESLint - just a couple more things we’ll need to add to our .eslintrc.json. The first time I set up this project, I noticed that the ESLint extension and VSCode’s built in TypeScript extension were clashing when I tried to import TypeScript files I had created. We’ll add two things to our .eslintrc.json file to prevent this. First, replace the “rules” at the bottom of the file with this:
"rules": {
  "import/extensions": [
    "error",
    "ignorePackages",
    {
      "js": "never",
      "mjs": "never",
      "jsx": "never",
      "ts": "never",
      "tsx": "never"
    }
  ]
}
Then after “rules”, add a “settings” property that looks like this:
"settings": {
  "import/resolver": {
    "node": {
      "extensions": [
        ".js",
        ".jsx",
        ".ts",
        ".tsx"
      ]
    }
  }
}
Those configurations will take care of ESLint recognizing how we import
our TypeScript modules. Finally, let’s add a lint script to
our package.json that will check every file in our project and fix any
issues it can. This will be a useful script to run before deploying our
project or even committing our code so that linting errors can’t creep in.
In your package.json, just add the following:
{
  ...
  "scripts": {
    ...
    "lint": "eslint src/** --fix --cache",
    ...
  },
  ...
}
The –fix option tells ESLint to try and fix any linting errors it comes
across. The –cache option will only lint files you have changed. This
will generate a .eslintcache file that you will want to add to your
.gitignore. Go ahead and test it out with npm run lint. You
should see it print a warning about the console.log
statement we had in our index.ts file. Good, it’s working. We’re getting
close to the ultimate TypeScript + Express template!
Setting up tests
As an old programming adage goes, “If it isn’t tested, it’s broken.” Our project isn’t going to be complete without a solid test suite, so let’s set that up. I’ve been using Jest to test my JavaScript code for quite some time now and have had a fantastic experience with it. The nice thing is, it’s also super easy to set it up with TypeScript. First, let’s install some packages:
$ npm i --save-dev jest ts-jest @types/jest
Next we’ll add a script to run jest. There should already be a “test” script in your package.json that npm put there when it created the file, so just replace that “test” script with the following:
{
  ...
  "scripts": {
    ...
    "test": "jest",
    ...
  },
  ...
}
Let’s test out Jest by first creating an example unit test file. I like
keeping my tests separate from my code, so I’m going to make a new
directory called tests and put a test file called
example.spec.ts inside.
$ mkdir tests
$ touch tests/example.spec.ts
Put the following into your example.spec.ts file:
describe("example", () => {
  it("works", () => {
    const message: string = "Hello";
    expect(message).toBe("Hello");
  });
});
How to write unit tests in jest is beyond the scope of this article, but
you can find a lot of great tutorials online and
at the official docs. Notice that if you
try and npm run test, you’ll get an error. That’s because
jest isn’t configured yet to understand TypeScript. Luckily, it’s easy to
fix. Just create a jest.config.js file in the root of your project and add
the following to it:
module.exports = {
  preset: "ts-jest",
  testEnvironment: "node",
};
Now if you run npm run test, you should see your test
passing!
One last thing before we’re good to go with testing - you’ve probably noticed that in VSCode, ESLint is squawking about “describe”, “it”, and “expect”. That’s because it doesn’t know that these global Jest variables exist, so we’ll have tell it about them. Open up your .eslintrc.json and add the following “overrides” option at the bottom:
{
  ...
  "overrides": [
    {
      "files": ["tests/*"],
      "env": {
        "jest": true
      }
    }
  ]
}
This tells ESLint that in our tests folder, the files will have access to the Jest global variables. You can learn more about ESLint environments here: https://eslint.org/docs/user-guide/configuring#specifying-environments
One last thing I like having running alongside Jest is
(jest-html-reporters)[https://www.npmjs.com/package/jest-html-reporters]
. It generates a report about your tests in the form of a beautiful HTML
page that lets you easily find which tests failed and why. When you’re
running hundreds or even thousands of tests, this is going to be an
invaluable tool. Install jest-html-reporters as a dev
dependency:
$ npm i --save-dev jest-html-reporters
Now you’ll have to tell Jest to use it. Modify your jest.config.js file to look like the following:
module.exports = {
  preset: "ts-jest",
  testEnvironment: "node",
  reporters: ["default", "jest-html-reporters"],
};
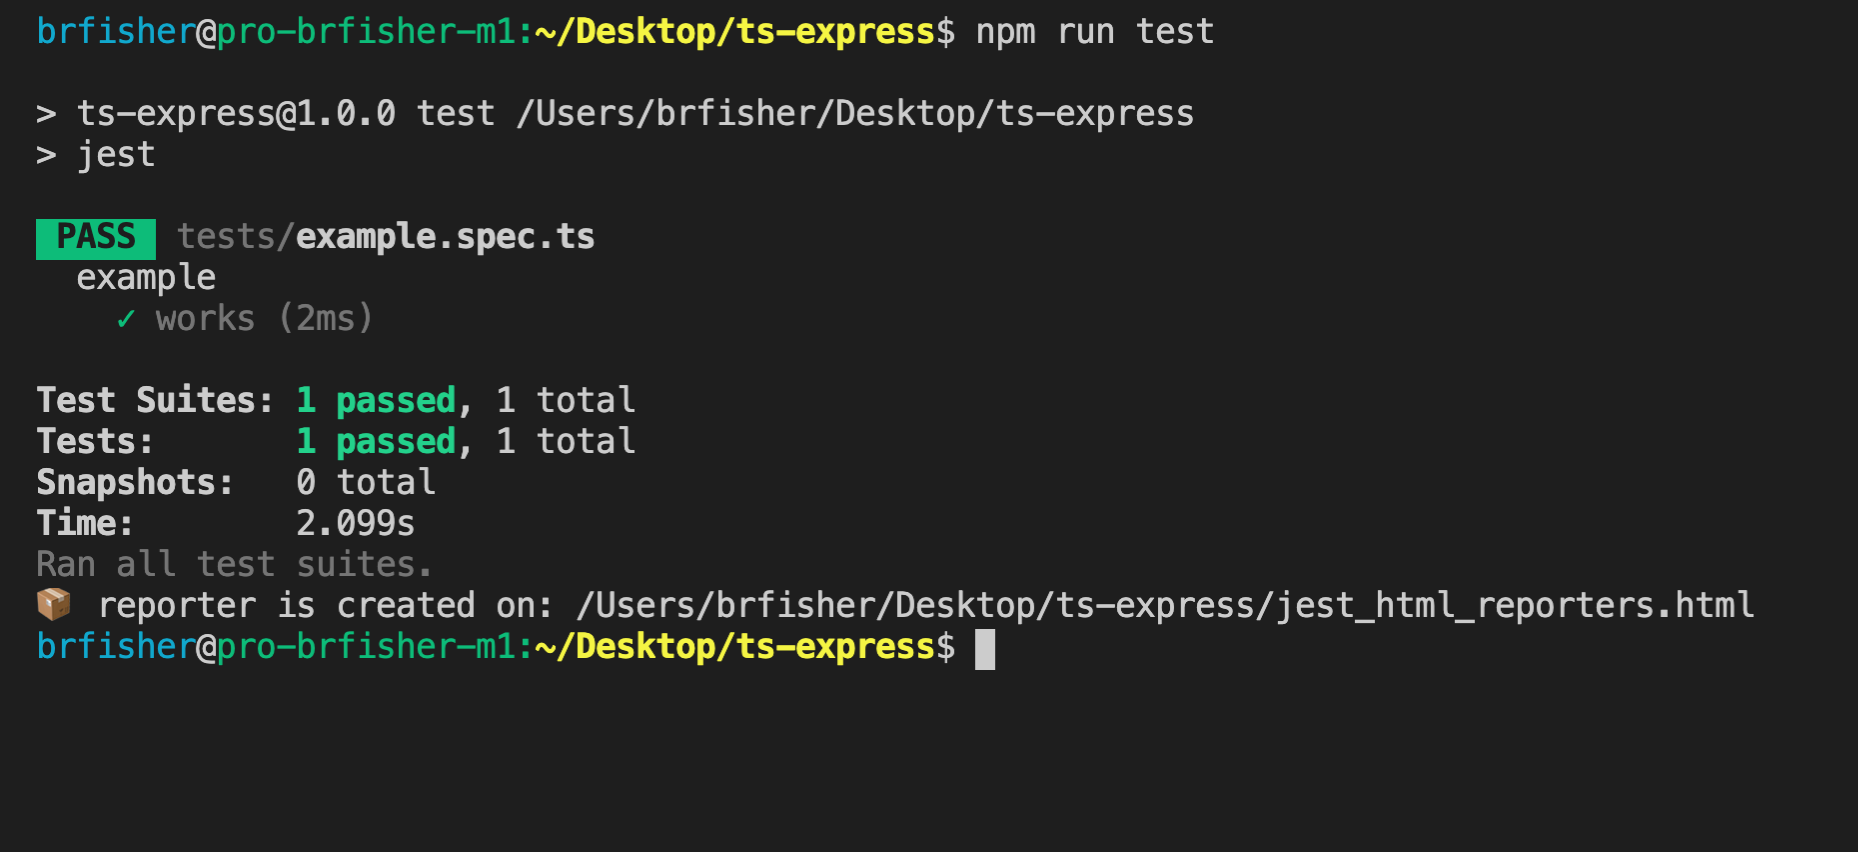
Run npm run test, and at the bottom of the console output
you’ll see that jest-html-reporters has created a jest_html_reporters.html
file. Open it up in your browser and you’ll see a beautiful report of your
test! Make sure you add jest_html_reporters.html to your .gitignore file.

Husky: Linting before committing
We now have just about everything we need for the perfect TypeScript + Express + ESLint template. We’re just going to add one more package called husky which can run scripts before we commit or push our code. First install it as a dev dependency:
$ npm i --save-dev husky
Now we’ll tell husky to lint our code before committing. We’ll make use of the “lint” script we have already created in our package.json. Inside of package.json, add this to the very end (before the final curly brace):
"husky": {
  "hooks": {
    "pre-commit": "npm run lint"
  }
}
Try committing your code, and you’ll see that it gets linted first!
Conclusion
That was quite a bit of setup, but now we have a template that we can reuse for any TypeScript + Express project we would want to create. With ESLint, the style across our codebase will stay consistent and we can focus on writing code instead of worrying about how it looks.
This article only scraped the surface of all the different configurations you could possibly have for a project such as this. It wasn’t too long ago that I hardly understood how to keep my codebase lint-free, and it was only by reading through the docs of each of the tools we’ve covered that I was able to understand how to set up this project.
I have the link to this template on my Github repository at the top of this article, but here it is again: https://github.com/bandrewfisher/ts-express-template
Additional reading
I would strongly recommend reading through the following documentation sites:
If you’d like to get started building an Express/TypeScript REST API, you could take a look at this article: